March 23, 2022

Ribbed Potholder Free Crochet Pattern


Ribbed Potholder Crochet Pattern

Ribbed Potholder Free Crochet Pattern

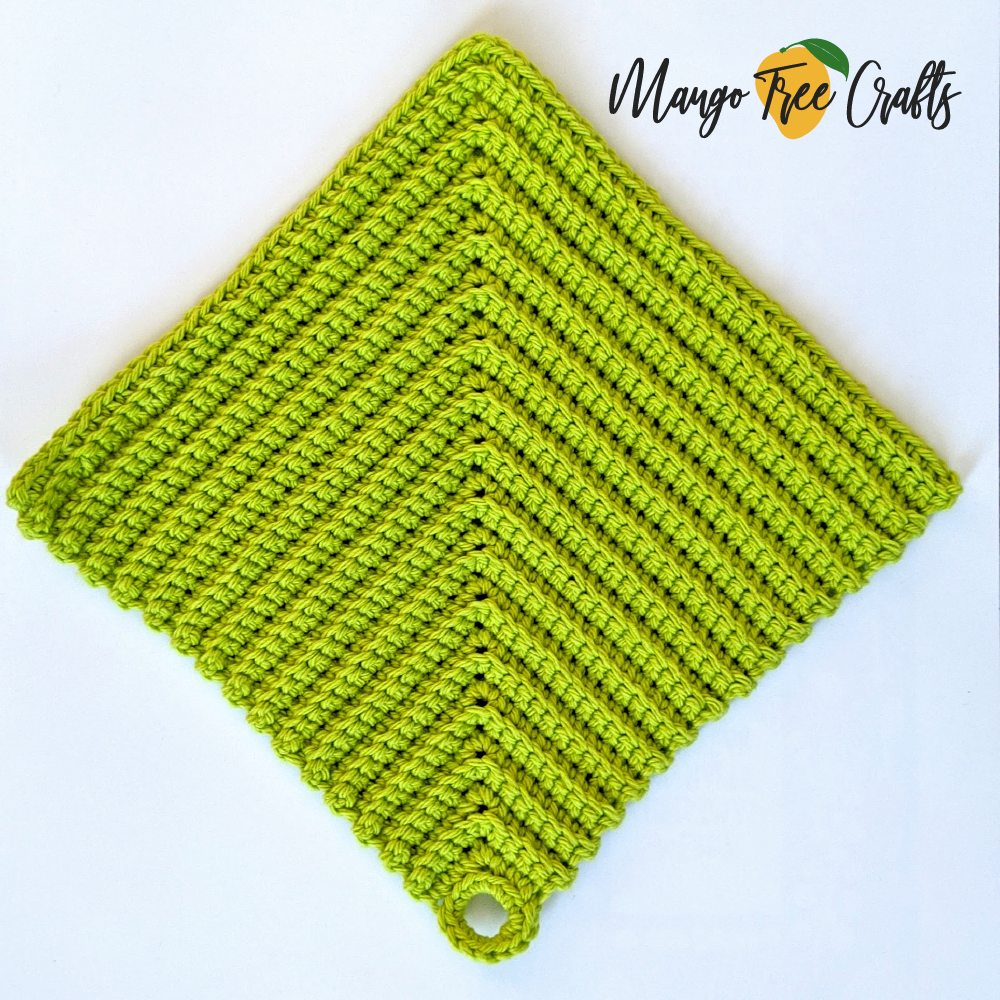
This crochet potholder pattern is a variation of the German potholder pattern by Katharina Sokiran from Ravelry. I really liked the unusual design of these – they are made starting from one corner – and the beautiful ribbed texture. The COVID-19 quarantine made me go back to my crochet hobby, and I made many of these potholders to gift to my friends once the pandemic is over.

Ribbed Potholder/Hot Pad – Free Crochet Pattern and Photo Tutorial

Ribbed Hot Pad Crochet Pattern

Materials Used:

  • Worsted weight 100% cotton yarn (I used Lily Sugar and Cream)
  • Hook F (3.75mm)
  • Tapestry needle

Abbreviations:

CH – chain
ST – stitch
R – row
SC – single crochet
SL ST – slip stitch

Keep in Mind:

  • The size of the finished potholder is approximately 8″x8″
  • The pattern is worked in back loops (this is how the ribbed look is created)
  • Only the first row is worked in the round (to form a loop for hanging), all other rounds are worked back and forth and the work is turned
  • CH1 at the beginning of the row does not count as stitch
  • Feel free to use yarn in different colors and/or alternate the colors

Pattern:

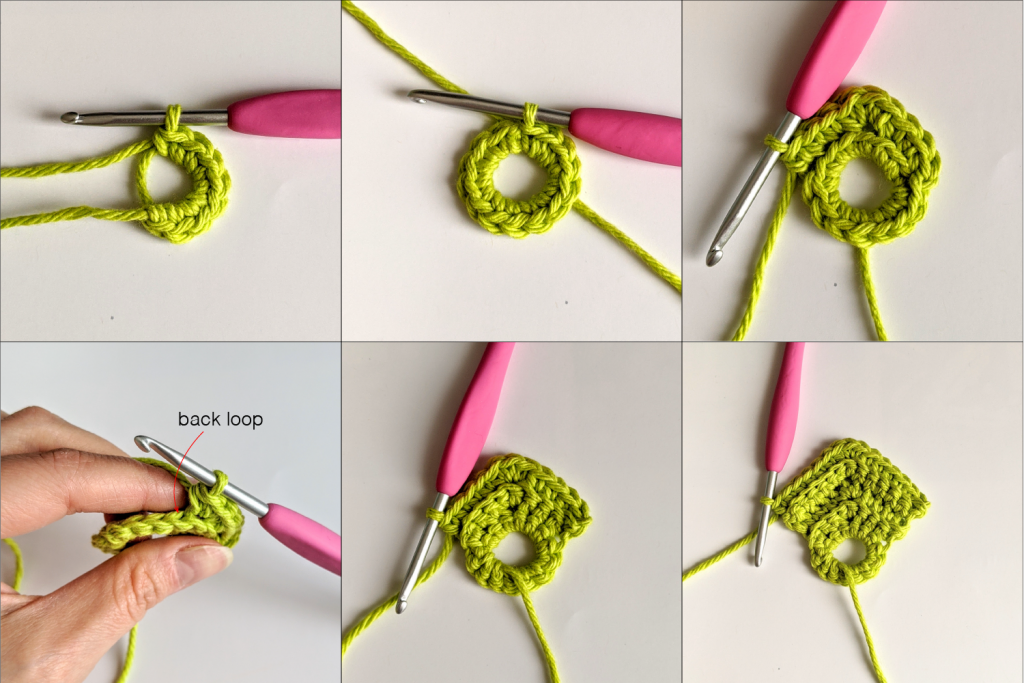
R1: Start with a magic ring, 14 SC into the magic ring, join with SL ST. (14) – This is the loop of the potholder.
R2: CH1, 3 SC into the next 3 ST, 3 SC into the next ST, 3 SC into the next 3 ST, turn. (9)
R3: CH1, 4 SC into the next 4 ST, 3 SC into the next ST, 4 SC into the next 4 ST, turn. (11)
R4: CH1, 5 SC into the next 5 ST, 3 SC into the next ST, 5 SC into the next 5 ST, turn. (13)
R5: CH1, 6 SC into the next 6 ST, 3 SC into the next ST, 6 SC into the next 6 ST, turn. (15)

See photos below for visual help.


R6: CH1, 7 SC into the next 7 ST, 3 SC into the next ST, 7 SC into the next 7 ST, turn. (17)
R7: CH1, 8 SC into the next 8 ST, 3 SC into the next ST, 8 SC into the next 8 ST, turn. (19)
R8: CH1, 9 SC into the next 9 ST, 3 SC into the next ST, 9 SC into the next 9 ST, turn. (21)
R9: CH1, 10 SC into the next 10 ST, 3 SC into the next ST, 10 SC into the next 10 ST, turn. (23)
R10: CH1, 11 SC into the next 11 ST, 3 SC into the next ST, 11 SC into the next 11 ST, turn. (25)
R11: CH1, 12 SC into the next 12 ST, 3 SC into the next ST, 12 SC into the next 12 ST, turn. (27)
R12: CH1, 13 SC into the next 13 ST, 3 SC into the next ST, 13 SC into the next 13 ST, turn. (29)
R13: CH1, 14 SC into the next 14 ST, 3 SC into the next ST, 14 SC into the next 14 ST, turn. (31)
R14: CH1, 15 SC into the next 15 ST, 3 SC into the next ST, 15 SC into the next 15 ST, turn. (33)
R15: CH1, 16 SC into the next 16 ST, 3 SC into the next ST, 16 SC into the next 16 ST, turn. (35)
R16: CH1, 17 SC into the next 17 ST, 3 SC into the next ST, 17 SC into the next 17 ST, turn. (37)
R17: CH1, 18 SC into the next 18 ST, 3 SC into the next ST, 18 SC into the next 18 ST, turn. (39)
R18: CH1, 19 SC into the next 19 ST, 3 SC into the next ST, 19 SC into the next 19 ST, turn. (41)
R19: CH1, 20 SC into the next 20 ST, 3 SC into the next ST, 20 SC into the next 20 ST, turn. (43)
R20: CH1, 21 SC into the next 21 ST, 3 SC into the next ST, 21 SC into the next 21 ST, turn. (45)
R21: CH1, 22 SC into the next 22 ST, 3 SC into the next ST, 22 SC into the next 22 ST, turn. (47)
R22: CH1, 23 SC into the next 23 ST, 3 SC into the next ST, 23 SC into the next 23 ST, turn. (49)
R23: CH1, 24 SC into the next 24 ST, 3 SC into the next ST, 24 SC into the next 24 ST, turn. (51)


R24: CH1, 25 SC into the next 25 ST, 3 SC into the next ST, 25 SC into the next 25 ST, turn. (53)
R25: CH1, 26 SC into the next 26 ST, 3 SC into the next ST, 26 SC into the next 26 ST, turn. (55)
R26: CH1, 27 SC into the next 27 ST, 3 SC into the next ST, 27 SC into the next 27 ST, turn. (57)
R27: CH1, 28 SC into the next 28 ST, 3 SC into the next ST, 28 SC into the next 28 ST, turn. (59)
R28: CH1, 29 SC into the next 29 ST, 3 SC into the next ST, 29 SC into the next 29 ST, turn. (61)
R29: CH1, 30 SC into the next 30 ST, 3 SC into the next ST, 30 SC into the next 30 ST, turn. (63)
R30: CH1, 31 SC into the next 31 ST, 3 SC into the next ST, 31 SC into the next 31 ST, turn. (65)
R31: CH1, 32 SC into the next 32 ST, 3 SC into the next ST, 32 SC into the next 32 ST, turn. (67)
R32: CH1, 33 SC into the next 33 ST, 3 SC into the next ST, 33 SC into the next 33 ST, turn. (69)

Cut off and weave in the ends.


Enjoy!

Lily


April 04, 2018

Mary Maxim Roots Cowichan Sweater Pattern Review


knitted cowichan sweater
Mary Maxim Roots Sweater. Photo by Julia Konovalov
Cowichan style sweaters have always inspired me, and I always wanted to knit one for myself. So when I saw this modernized version of an old Mary Maxim pattern, I purchased it as a kit from the Mary Maxim website back in 2016. It is not available as kit any more, but you can still purchase the pattern from here. It is designed for the bulky yarn weight and uses four yarn colours: grey, black, off white and red. There are different sizes available from S to XL.

cowichan knitted sweater
Mary Maxim Roots Sweater
The pattern itself looks like a graph and uses the fair isle knitting technique (colours are switched at the back). The sweater consists out of five pieces in total. It took me over a year to knit it (with a lot of pauses). Then about two days to put it together and weave in ends.
My sweater turned out to be very oversized. I followed the instructions for size M, but it turned out to be more like XL.
I am still very happy with this project: it was fun working on it and boy! was I happy to finish it! I haven't knitted any sweaters for myself since I was in high school, so it was nice to work on something like this again.
roots sweater
Mary Maxim Roots Sweater. Photo by Julia Konovalov
Roots and Mary Maxim are both old Canadian companies. Here is some additional information on their collaboration in this project.

Did you knit or spot any cowichan style sweaters? Let me know about your experience in comments!
Lily

*All Photos are subject to copyright.*

January 11, 2017

Bulky Cross Stitch Cowl Free Crochet Pattern


This bulky crochet cowl is fast and easy to make - I was able to crochet one in half an hour using a super bulky yarn (#6). I made it using a slightly modified single crochet stitch (it looks like cross stitch hence the name), but the result was very impressive! The crochet cowl is simple, yet rich in texture. It is unisex (can be worn by both women and men) and great for gift giving. This pattern includes a video tutorial on how to make the cross stitch single crochet.
Cross Stitch Cowl Crochet Pattern
Cross Stitch Cowl Free Crochet Pattern


Materials used:
Super bulky weight yarn (6) (I used Bernat Wool-up Bulky or Lion Brand Wool-Ease Thick and Quick) about 90 g (half skein)
Hook L 8mm (you may want to use a larger hook if you crochet tight)


Abbreviations:
CH – chain
CSSC – cross stitch single crochet
SL ST – slip stitch


The finished cowl measures 
5 inch. heigh (12,5 cm)
12,5 inch. wide (31,5 cm)
25 inch. diameter (63 cm)


In this short video above I show and explain how to crochet a cross stitch single crochet (CSSC). (Written instructions following).

To work Cross Stitch Single Crochet – insert hook into next stitch. DO NOT make yarn over the hook, instead with hook pointing down grab the yarn and pull up a loop, yarn over and pull through two loops on hook.

Pattern:

Round 1: CH 42 and SL ST at the end of the round to the first CH1, making sure not to twist the stitches. (42)
Round 2: CH 1 (does not count as stitch), CSSC 42 times around, DO NOT join with SL ST, continue working in spiral. (42)
Round 3-9: CSSC 42 times around. (42)
Finish round #9 with a SL ST. Cut off yarn and weave in ends.


Enjoy!
Lili
***Please do not copy and post this pattern and claim it as your own. Please do not re-publish photos as your own.***

December 21, 2016

Messy Bun Hat Free Crochet Pattern in 3 Sizes


Messy bun hairstyle has been a huge hit in 2016. Many crochet messy bun hat patterns have been circulating over social media since fall arrived, and I was asked by some lovely people if I could ajust my Basic Beanie Crochet pattern according to this trend, and I did!

Cluster Stitch Messy Bun Crochet Hat Pattern in three Sizes

Messy Bun Crochet Hat Pattern
Crochet messy bun hat has an opening at the top to fit bun or ponytail. If you prefer a traditional style pattern without the opening, please refer to my Basic Beanie Crochet Hat Pattern.

I created Messy Bun Crochet Hat pattern in three most popular sizes - Child, Preteen and Teen/Adult and published them as separate blog posts for easier reading. Click on the links below:


Messy Bun Hat Pattern - Size Adult - Click here for Free Online Pattern


Enjoy! Lili

***Please do not copy and post this pattern and claim it as your own. Please do not re-publish photos as your own.***

Messy Bun Hat Free Crochet Pattern Size Adult


Messy bun Hat pattern
Messy Bun Hat Crochet Pattern
Materials used:
Hair tie about 2" in diameter
Worsted weight yarn (I used Bernat Wool-Up Worsted)
Hook H (5mm)
Hook G (4mm)

Abbreviations:
CH – chain
ST – stitch
SC – single crochet
Sl ST – slip stitch
Cl ST – cluster stitch
YO – yarn over

In this short video I show and explain how to crochet a Cluster Stitch. (Written explanation following).

To work Cluster Stitch – YO, insert hook in next ST, YO and pull up a loop, YO and draw through 2 loops on hook, YO, insert hook in same stitch, YO and pull up a loop, YO and draw through 2 loops on hook, YO and draw through all 3 loops on hook.

Cluster Stitch Messy Bun Crochet Hat Pattern, Size Teen/Adult

Finished hat measures approx.:
7 1/4 in (18cm) top to bottom, 
10 1/2 in (26 cm) across, 
for head circumference 22 in (56cm)

Use Hook H
Round 1: SC 30 around a hair tie, join with Sl ST (30)
Round 2: CH3, Cl ST in each ST around, join with Sl ST (30)
Round 3: CH 3*Cl ST 2 times in next ST, Cl ST 1 time in each of next 2 ST*, join with Sl ST (40)


Round 4: CH 3, Cl ST around, join with Sl ST (40)
Round 5: CH3, * Cl ST 2 times in next ST, Cl ST 1 time in each of next 3 stitches*, join with Sl ST (50)
Round 6-8: CH 3, Cl ST around, join with Sl ST (50)
Round 9: Ribbing: Change hook to G, place marker, work * 2SC in first ST, 1SC in next ST in back loops*, do not join, continue working in spiral (75)
Round 10 - 17: SC in each ST around in back loops (75). Join with SL ST at the end of the last round. Fasten off, weave in ends.

Enjoy! Lili

***Please do not copy and post this pattern and claim it as your own. Please do not re-publish photos as your own.***


Messy Bun Hat Free Crochet Pattern Size Preteen


Messy Bun Hat Pattern
Messy Bun Hat Free Crochet Pattern
Materials used:
Hair tie about 2" in diameter
Worsted weight yarn (I used Bernat Wool-Up Worsted)
Hook H (5mm)
Hook G (4mm)

Abbreviations:
CH – chain
ST – stitch
SC – single crochet
Sl ST – slip stitch
Cl ST – cluster stitch
YO – yarn over


In this short video I show and explain how to crochet a Cluster Stitch. (Written explanation following).

To work Cluster Stitch – YO, insert hook in next ST, YO and pull up a loop, YO and draw through 2 loops on hook, YO, insert hook in same stitch, YO and pull up a loop, YO and draw through 2 loops on hook, YO and draw through all 3 loops on hook.


Cluster Stitch Messy Bun Crochet Hat Pattern, Size Preteen


Finished hat measures approx.:
6 3/4 in (17 cm) top to bottom, 
9 in (23 cm) across, 
for head circumference 18 in (46 cm)

Use Hook H
Round 1: SC 27 around a hair tie, join with Sl ST (27)
Round 2: CH3, Cl ST in each ST around, join with Sl ST (27)
Round 3: CH 3*Cl ST 2 times in next ST, Cl ST 1 time in each of next 2 ST*, join with Sl ST (36)

Round 4: CH3, * Cl ST 2 times in next ST, Cl ST 1 time in each of next 3 stitches*, join with Sl ST (45)
Round 5: CH 3, Cl ST 2 times in next ST, Cl ST in next 21 stitches, Cl ST 2 times in next ST, Cl ST in next 22 stitches, join with Sl ST (47)
Round 6: CH 3, Cl ST around, join with Sl ST(47)
Round 7-8: Repeat round 6 (47)

Round 9: Ribbing: Change hook to G, place marker, work * 2SC in first ST, 1SC in next ST in back loops*, do not join, continue working in spiral (71)

Round 10 - 15: SC in each ST around in back loops (71). Join with SL ST at the end of the last round. Fasten off, weave in ends.


Enjoy! Lili

***Please do not copy and post this pattern and claim it as your own. Please do not re-publish photos as your own.***


Messy Bun Hat Free Crochet Pattern Size Child


Crochet Messy Bun Hat Pattern
Messy Bun Hat Crochet Pattern
Materials used:
Hair tie about 2" in diameter
Worsted weight yarn (I used Bernat Wool-Up Worsted)
Hook H (5mm)
Hook G (4mm)

Abbreviations:
CH – chain
ST – stitch
SC – single crochet
Sl ST – slip stitch
Cl ST – cluster stitch
YO – yarn over

In this short video I show and explain how to crochet a Cluster Stitch. (Written explanation following).

To work Cluster Stitch – YO, insert hook in next ST, YO and pull up a loop, YO and draw through 2 loops on hook, YO, insert hook in same stitch, YO and pull up a loop, YO and draw through 2 loops on hook, YO and draw through all 3 loops on hook.

Cluster Stitch Messy Bun Crochet Hat Pattern, Size Child


Finished hat measures approx.:
6 in (15cm) top to bottom, 
8 in (20,5 cm) across, 
for head circumference 16 1/2 in (42cm)

Use Hook H
Round 1: SC 22 around a hair tie, join with Sl ST (22)

Round 2: CH3, *Cl ST 2 times in next ST, Cl ST 1 time in next ST*, join with Sl ST (33)
Round 3: CH3, * Cl ST 2 times in next ST, Cl ST 1 time in each of next two stitches*, join with Sl ST (44)
Round 4: CH 3, Cl ST around, join with Sl ST (44)


Round 5 - 7: Repeat round 4 (44)

Round 8: Ribbing: Change hook to G, place marker, work * 2SC in first ST, 1SC in next ST in back loops*, do not join, continue working in spiral (66)
Round 9 - 15: SC in each ST around in back loops (66). Join with SL ST at the end of the last round. Fasten off, weave in ends.

For flower pattern please refer to this tutorial on my blog.

Enjoy! Lili

***Please do not copy and post this pattern and claim it as your own. Please do not re-publish photos as your own.***

Six Petal Flower Free Crochet Pattern and Photo Tutorial


Flower Crochet Pattern
This crochet flower is my to-go embellishment for crochet hats. Here is a detailed photo tutorial on how to make it:

Yarn used: Worsted weight yarn
Hook used: Hook H (5mm)

Abbreviations:
CH – chain
ST – stitch
SC – single crochet
DC - double crochet
Sl ST – slip stitch

Pattern:

Round 1: CH3, 6DC into the 2nd CH from hook, Sl ST to the 1st DC to join. (6)

Round 2: (Small petals):*CH2, 3DC into same ST, CH2, Sl ST to the same stitch, CH1, Sl ST to the next ST*. Repeat from * to * six times in total for six petals.


Round 3: (Foundation for next round of petals - work behind the petals): *CH3, Sl ST to the CH1 space of previous round*. Repeat from * to * six times in total.
Round 4: (Medium petals): *CH2, 5DC into same CH3-space, CH2, Sl ST to the same space, CH1, Sl ST to the next CH3-space*. Repeat from * to * six times in total for six petals.
Round 5: (Foundation for next round of petals - work behind the petals): *CH4, Sl ST to the CH1 space of previous round*. Repeat from * to * six times in total.
Round 6: (Large petals): *CH2, 6DC into same CH4-space, CH2, Sl ST to the same space, CH1, Sl ST to the next CH4-space*. Repeat from * to * six times in total for six petals. Weave in ends and leave a long tail for sewing the flower to hat.
Enjoy! Lili

***Please do not copy and post this pattern and claim it as your own. Please do not re-publish photos as your own.***


September 27, 2016

Ribbed Boot Cuffs Free Crochet Pattern


Boot cuffs crochet pattern
Ribbed boot cuffs
Fall is in the air and if you love crochet accessories as much as I do why not make these crochet boot cuffs? They can be worn over the boot for shorter boots and inside the boot for higher boots. You will find a free crochet pattern below. I made them using a crochet technique called 'slip stitch into back loops'. This technique makes your crochet look like knitted ribbing! Garments made using this stitch have rich texture and stretch nicely. This technique can be used for crocheting wrist warmers, coffee cup cozies, phone sleeves, you name it! These quick and easy crochet projects make great Christmas gifts and stocking stuffers.

Yarn used: Caron Simply Soft Acrylic yarn. Any worsted weight yarn will work.
Hook used: 5 mm (H)
Abbreviations:
CH – chain
ST – stitch
SC – single crochet
Sl ST – slip stitch

Finished boot cuffs measure 4'' long. If you wish them to measure 6", chain 31 for the first row instead of 21.

Pattern: 
I have created a short video where I show how to crochet the first few rows of this pattern:


Row 1: CH 21
Row 2: SL ST into back loop of the 2nd CH from hook, SL ST into the remaining back loops till the end of the row, turn (20)
Row 3: CH1, SL ST into back loops till the end of the row, turn (20)
Rows 4-65: Repeat row 3.

Once you reach the desired width cut off yarn and sew sides together using mattress stitch:


Boot cuffs crochet pattern
Ribbed boot cuffs free crochet pattern


Enjoy! Lili

***Please do not copy and post this pattern and claim it as your own. Please do not re-publish photos as your own.***